Clips and lanes
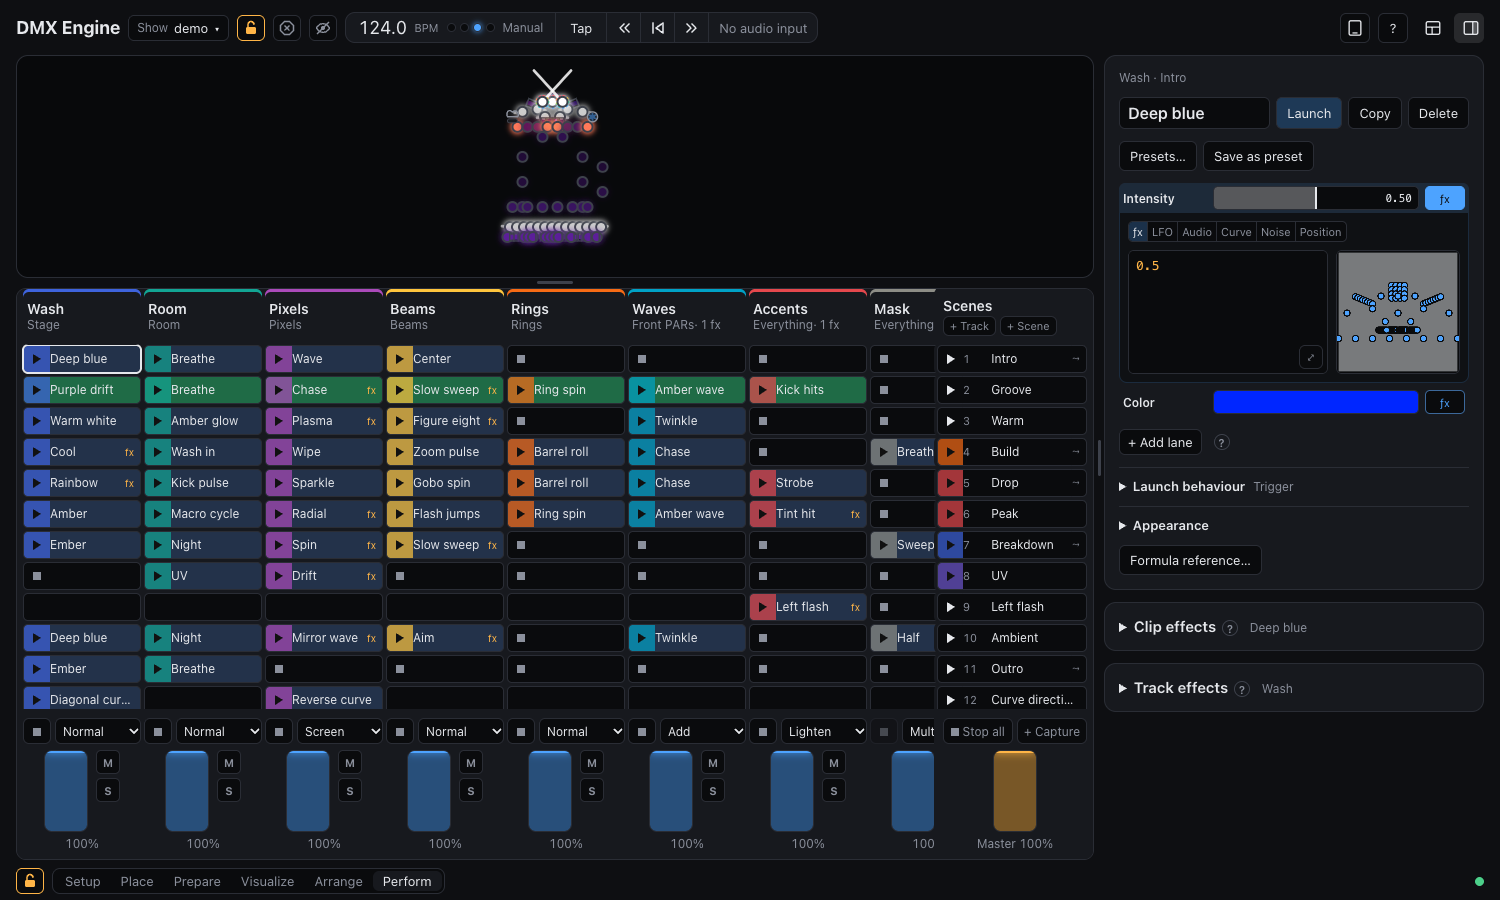
A clip is a cell in the grid: a look for one track. Click a clip's name to select it, and the inspector shows the clip editor. Double-click an empty slot to make an empty clip there, ready for its first lane; selecting an empty slot also offers Create clip and From preset….
Lanes
A clip is made of lanes. A lane sets one parameter, with a formula that is evaluated for every fixture every frame. A clip only changes the parameters it has lanes for, so a clip with just a color lane leaves the intensity to the tracks below.
Add lane under the lanes, or ⌘K, opens a list of the parameters the clip doesn't have yet. Type to search by name or by group, such as beam, and press Enter or click to add one. They are the same for every fixture, and each fixture turns them into its own channels, so one clip works on PARs, washes and spots alike. Lanes the track's fixtures have no channel for (a Pan lane on a PAR) are marked in the list; you can still add them, they just change nothing on that track. A lane already in the clip that the track doesn't use is dimmed too, with a note when you open it:
- Intensity and Color: one color lane carries the whole RGB color. Write
#ff8800, ormix(#f80, #06f, sine(beat / 4 + x)). Fixtures with white, amber or CMY mixing get them from the color. - UV
- Pan, Tilt, and Pan spin and Tilt spin for endless heads (0.5 stops, further from it is faster)
- Move in dark: gets heads to each flash and stops them there before the light comes on. At 0.5 and above, a head plays its whole look one beat late, so it can see its next flash coming and go there as soon as it's dark. Flashes still land on beats, one beat later; other fixtures aren't delayed, and anything following the audio reaches these heads a beat late. The grand master and blackout stay immediate. A new lane starts at 1 (on). Set how long each head needs with Move time in Layout
- Strobe: 0 is off, and above that it flashes from once a second at the slow end to twenty times at the fast end. A fixture whose definition gives its strobe's speed in Hz flashes at that rate, as near as it goes; one that doesn't say has its range spread over the lane. A fixture with no strobe of its own is strobed by the engine, which flashes its light on and off, so every fixture has the lane; at the DMX frame rate of 44 a second that's clean up to about ten flashes a second.
- Zoom, Focus
- Frost (0 clear to 1 full), Iris (0 open to 1 closed) and Move speed (0 slowest to 1 fastest) for heads that have those channels
- Gobo, Prism, and gobo and prism spin. Prism below 0.5 is out; from 0.5 to 1 it puts in the fixture's prisms in turn, the first at 0.5 and the last at 1, so a head with an 8-facet and a linear prism has the 8-facet at 0.5 and the linear one at 1. A head with a second prism of its own, on a channel of its own, has Prism 2 and Prism 2 spin for it, working the same way, so the two go in and turn independently.
- Fx and Fx speed: a fixture's own built-in effects, such as LED ring programs
- On lasers, Pan and Tilt move the beam (the middle of the range is centered), Zoom is the pattern size and Gobo spin turns the pattern; Fx picks a built-in pattern
- Fog output and Fan speed, from 0 (off) to 1 (full); the grand master scales fog but leaves fans running
Read and set lanes at a glance
Each lane is one row, grouped with its neighbours, so a clip's whole look fits on screen:
- A lane set to a plain number is a fader. Drag it sideways to change it, hold Shift for fine control, or double-click to type a number or a formula; the arrow keys step it when it has focus. A click on its own never moves it. The lights follow while you drag, and the whole drag is one undo step. Spin lanes and Fx speed fill from the middle, where they stop. Gobo, Prism and Fx only mark where they are, because their steps depend on the fixture. Pan and Tilt move in finer steps than the rest.
- Move in dark at a plain number is an On/Off switch.
- A plain color is a swatch: click it to pick a color, and hover to read its hex.
- A number that moves shows its live value per fixture on the same scale as a fader: each tick is a fixture, and the band behind them is the lane's range. On a helper that's what its range lets it reach; on a formula it's the lowest and highest values of the last few seconds.
- A color that moves shows a strip of colors, one per fixture.
Drag a moving number lane to adjust it without opening it. Sideways moves the whole range, and up or down makes it wider or narrower around its middle, both in the same drag if you like, which is handy for fitting a moving head's sweep to the stage; hold Shift for fine control. The row holds still while you drag and picks up again on release, and the lights follow as you go. Dragging changes the lane's Range (below), never its formula or helper, so formulas that remember their input with smooth, delay or env carry on undisturbed. A double-click on the row puts the range back to 0–100%, and also removes the scale and offset that older versions wrote at the end of a formula, such as (sine(beat)) * 0.8 + 0.1. The band turns orange when the range runs past 0 or 1, where values stop; the shape inside keeps its proportions, so dragging back brings it all back. Gobo, Prism, Fx and switches can't be dragged this way.
The button at the end of a row unfolds that lane's editor right under it, and says what drives the lane: ƒx, LFO, Audio, Curve, Noise or Pos (Position), with + after it when modifiers follow. It's highlighted when something other than a plain value runs the lane, and filled while the lane is open. One lane opens at a time, and the choice carries over when you select another clip that has the same lane. On a lane set to a plain number or a plain color, rest the pointer on that button to pick a helper straight away; it opens with the lane, and a color becomes the first stop of its gradient. Beside the source buttons of a lane that moves, Fix value stops it at what it's doing now.
With editing locked the rows still show every value, but nothing moves. These faders change the clip itself, so they're for building looks, not for playing a show.
Select, remove and copy lanes
Click a lane's name to select it; ⌘-click adds or removes one, and ⇧-click selects a range. Delete removes the selected lanes in one undo step, and the buttons beside Add lane do the same. ⌘C and ⌘X copy and cut them. Select any other clip and press ⌘V, or use Paste, to add them there; a lane it already has for the same parameter is replaced, and everything else in that clip stays. Esc clears the selection.
Fill in a lane
Start with a formula, or let a helper write it for you. The buttons at the top of an open lane choose:
- ƒx: a formula, e.g.
sine(beat / 2 + x)for a wave moving across the layout. See Moving with the music. - LFO: a shape, a rate and a spread across the group. The rate is any number of beats per cycle, such as 3 or 1.5; the list beside it has the usual ones, from 1/4 beat to 8 bars.
- Audio: follow bass, mid, high, level or kick.
- Noise: flowing plasma or evolving smooth noise across the group.
- Position: where each fixture sits, holding still: 0 at one end of a direction and 1 at the other. The directions are the ones LFO and Curve spread in: across, down, the diagonals, group order, out from the middle or in from the edges, or a random order. With random order, Shuffle picks new values every that many beats.
- Curve: draw a shape that loops from when the clip launches (or plays once). Click to add a point, drag to move it, double-click to remove it.
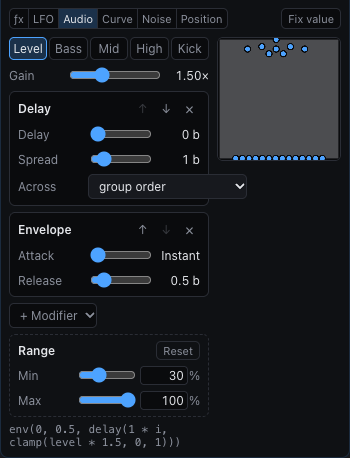
Helpers make values from 0 to 1. Under a helper, + Modifier adds steps that change what it makes, applied from top to bottom; ↑ and ↓ reorder them, × removes one. Order matters: a Gate after Smooth cuts the smoothed value, while Smooth after a Gate eases the gate too.
- Gate: lets the value through while an audio band (level, bass, mid, high or kick) is loud. Below Threshold it's muted, 10 percentage points above it fully open; a meter shows the band now with the threshold marked. Release fades it out over that many beats once the band falls quiet instead of cutting, and Attack eases it open.
- Envelope: follows the value up over Attack and back down over Release, so kicks and other hits get tails.
- Smooth: eases every change, up and down alike, over a number of beats.
- Delay: plays the value later, plus Spread more beats across the group in the chosen direction. After an Audio helper, the music runs across the rig as a chase.
- Invert: turns 0 into 1 and 1 into 0.
- Steps: rounds to a few levels between 0 and 1.
- Response: bends the curve; above 1 keeps low values darker, below 1 lifts them.
Color helpers
The Color lane has the same sources. A helper there makes 0 to 1 per fixture as usual, its modifiers change that, Range picks the part of it spread over the colors, and Colors turns it into a color; a strip shows the colors from 0 on the left to 1 on the right.
When the source only covers part of 0 to 1, a Position middle → edges on a wide rig that never reaches its corners for example, narrow the Range to it: Min lands on the first color and Max on the last, so every color gets used. Moving both shifts the colors along, like brightness; narrowing them stretches the colors, like contrast. Min above Max runs the colors backwards.
The lane's row then shows its colors, with a tick where each fixture lands on them, and the band they cover. Drag it as you would a number lane's: sideways slides the fixtures along the colors and up or down spreads them over more or fewer of them, which changes the Range; double-click goes back to 0–100%. A looped gradient wraps the ticks round. A Color lane written as a formula keeps its strip of live colors, since a formula doesn't say where along any colors it is.
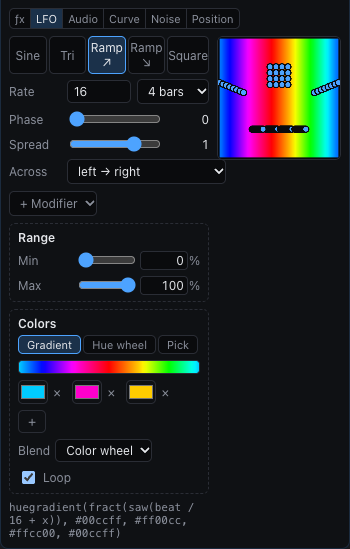
- Gradient: blends from the first color to the last. Blend is Color wheel, keeping colors saturated (red to blue passes through magenta), or RGB, straight between them, which can pass through grays. Loop joins the last color back to the first, so a moving gradient never jumps.
- Hue wheel: hues around the wheel from Start over Span (a full turn is a rainbow, a small one a few nearby shades), at a Saturation.
- Pick: one of the colors, each taking an equal share, without blending.
Some ways to spread colors: Position left → right with a gradient for a still wash across the rig; middle → edges for a color that changes outwards; random order with Pick and a shuffle for a scatter that changes every bar; an LFO ramp with spread, a looped gradient and Delay for colors that scroll; Steps after any of them for hard bands. Switching between Gradient and Pick keeps the colors.
Every number lane ends with a Range: what the formula's 0 and 1 become, from Min to Max. Its formula, helper and modifiers stay the same; the range is applied after them, and it's the same pair of numbers dragging the lane's row changes. New helpers on Pan, Tilt, Zoom, Focus and the spins start with a range that suits them, such as 30–70% for a sweep around the middle. Type a percentage beside either slider to go past 0 or 100%, as dragging the row can; the slider then turns orange at its end. Reset goes back to 0–100%. A plain number has no range.
Editing a helper's formula by hand turns the helper and its modifiers off; the range stays. Shows saved before modifiers existed open with each helper's minimum and maximum as the lane's range, and a curve's bass gate as a Gate modifier that cuts as it did.
Launch behavior
Open Launch behavior in the clip editor:
- Mode: Trigger or Momentary (plays while its button is held).
- Fade: the clip's own fade, or the scene's or show's if left default.
- Ignore scene launch: protects a playing clip across scene launches and stops its own scene from launching it.
- Quantization: the clip's own beat or bar setting, which wins over the scene's and the show's.
- Next clip action: after a chosen number of beats or minutes from launch, play next, previous, random, first or last, or stop. In block limits the choices to consecutive clips around this one; an empty slot ends the block. Each launch restarts the timer, and a manual launch queued meanwhile takes priority.
Launching itself is in Launching clips and scenes.
Appearance and effects
Appearance holds the clip's grid color. Clips inherit their track's color unless you choose one; Use track color restores inheritance. Clip effects sit below the lanes; see Effects.
Copy and paste
Select a clip and press ⌘C (⌘X moves it), select any slot on any track, and press ⌘V. The Copy and Paste buttons in the clip editor do the same. Lanes, helpers and effects come along; pasting over a clip replaces it, and Undo brings it back.
Scenes
A scene is a row. + Scene (⌘I) adds one; + Capture (⇧⌘I) adds a scene made of the clips playing right now. A scene can have its own fade (a cut for the drop, two bars for the breakdown) and its own quantization, and can be scheduled to launch at a clock time like 04:00 every day: set it in the scene's panel. A schedule uses the engine computer's local time and works even with editing locked, but only while the engine is running; missed times are skipped.