The arranger
The arranger lays clips out along a timeline, so a whole show can be drawn out in advance and played back the same way every time, with its music. Arrangements are saved with the show, and a show can have several, say one per song.
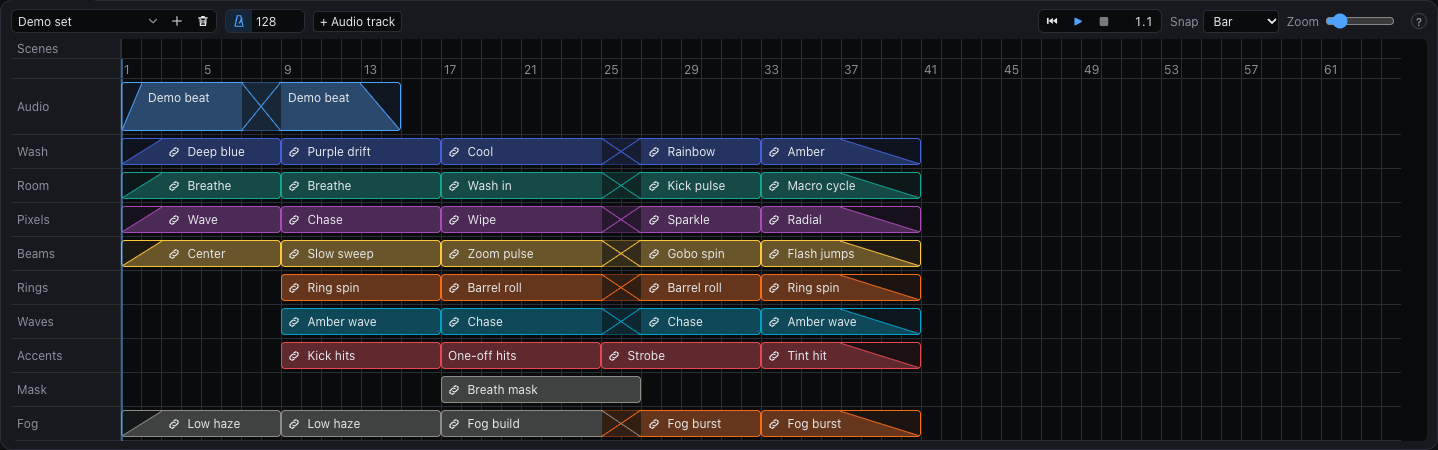
The Arrange layout has it under the 3D stage, in a tab beside the launch grid, with the Inspector down the right. It can go in any layout, chosen in the layout editor.
Putting clips down
Each track of the show has a row. Click an empty part of a row and choose one of its clips to place it there. Click the Scenes row to place a whole scene: every clip in its row at once, one per track.
Placements are references, not copies: change a clip and every placement of it changes, and moving a clip in the launch grid keeps its placements.
- Move a placement by dragging it along its row.
- Trim by dragging either end. Trimming the front starts part way into the clip.
- Remove the selected placement with Delete.
- New empty clip at the top of a row's menu makes a clip that lives only on this timeline, ready to fill in.
- Move to another track by dragging a placement to its row, which lights up.
- Select several with Shift or ⌘ held. Dragging one moves them all, keeping them apart as they were, and Delete removes them all.
- Copy and paste with ⌘C and ⌘V: the copy lands at the playhead, on the track it came from.
- Duplicate with ⌘D: the copy lands right after the original, or after the whole selection.
Tracks
The rows are the show's tracks, so a change here is a change in the launch grid too.
- Click a track's name to select it and see it in the Inspector, with Shift or ⌘ held for several.
- ⌘T adds a track, and ⇧⌘T an audio track. A browser may keep ⌘T for itself; the desktop app doesn't.
- Drag a name up or down to rearrange the tracks.
- Delete removes the selected tracks, from the launch grid as well, with everything placed on them. Deleting an audio track takes its clips. Undo brings them back.
Deleting a clip from the launch grid takes its placements off every timeline too.
Editing clips
Selecting a placement shows it in the Inspector: its clip, with the placement's fades under the name, then lanes and effects, the same as in the clip editor.
A placement with the link icon is linked to a clip in the launch grid. Editing it changes that clip, and every other placement of it. Make local gives this placement a copy of its own, so that you can change it without touching the rest. A local clip has no link icon and belongs to the timeline alone: no scene launches it, and it goes when its last placement does.
Moving a linked placement to another track also makes it local there, as the clip in the launch grid stays where it is. Pasting a local clip gives a separate copy, and pasting a linked one gives another link.
Fades and crossfades
A placement cuts in and out until you give it a fade. The clip's own Fade and the show's don't apply on a timeline, so what you see is what plays.
- Fade in or out: hover a placement, or select it, and drag the small handle in its top corner along the placement. The ramp drawn across it is the fade. Dragging the handle back to the corner returns to a cut, and fades land on the beat or on the snap if that's finer. Fade in and Fade out in the Inspector set them in beats.
- Crossfade: overlap two placements on a row, by dragging one over the other or trimming its end past the other's start. The overlap is the crossfade, and it's marked with an X. Drag the left half of the X to move where the next placement starts and the right half to move where the last one ends. Pull them apart and the crossfade is gone, with any fades they had coming back.
- Inside another: a short placement wholly inside a longer one plays over it, with its own fades, and the long one carries on underneath.
The fade handles at an end in a crossfade are gone while it lasts, since the overlap sets that fade. Only the placement that started last and the one under it show at once, so three overlapping placements are best avoided.
Snap sets the grid things land on, and Zoom how much of the timeline fits. You can also pinch on a trackpad, or hold Ctrl or ⌘ and scroll, to zoom around the pointer. Bar numbers run along the top. Every change can be undone.
Audio
An arrangement can have rows of audio under its clips, as many as you like. + Audio track or ⇧⌘T adds one. Click a row to add a file, or drop one on it from the desktop. MP3, FLAC, WAV, AIFF, AAC, ALAC and Ogg Vorbis all work. The file is copied into an audio folder beside the show file, so keep that folder with the show when you move it.
Audio clips work like placements. Drag one to move it, drag an end to trim it, and use the top corners for fades. Overlapping two on a row crossfades them, with the sound staying level through the middle. Delete removes the selected one. Clips on different rows simply play together. The bottom edge of a row's name makes the row taller or shorter, to see the waveform better or to save room, and the rows stay that way in this window. Select an audio track by its name to rename it in the Inspector, or drag the name to rearrange the rows.
Selecting an audio clip shows it in the Inspector: Name, Color, Gain to make it quieter or louder, its fades, and its beat grid. The clips on the timeline hear the audio as it plays, at its gain and through its fades: bass, kick and the other audio values are what the timeline's audio is doing at that moment, wherever you jump to. Clips launched from the grid carry on hearing the audio input, and so does a timeline with no audio on it.
Audio always plays at its own speed and pitch, so it stays with the timeline only at a set tempo. The first file you add offers to do that: Use that tempo and line it up sets the arrangement's tempo to what was found in the file, and starts the clip on its first beat. Put the clip's start on the bar you want. If the engine got it wrong, correct BPM and Beat under Beat grid, then press Use tempo and line up. The grid has one tempo, so a song that changes speed drifts away from it.
If a file has gone missing the clip says so and stays silent.
Playing it
The transport in the panel's header plays the timeline straight on the lights. Blind mode stays as you left it: turn blind mode on first if you want to work without touching the lights, and the transport plays there instead.
- ▶ plays from the playhead, or Space while the arranger has focus. ❚❚ pauses.
- ⏮ goes back to the start, or Home.
- ■ stops at the next launch point. The playhead goes back to where you pressed play.
- Left and Right move a bar, with Shift four bars. Click the bar numbers to go somewhere directly.
Playing from the transport puts it over everything else. Pausing holds it where it is and leaves anything launched from the grid running. Play carries on from exactly there. Moving while nothing plays only moves the playhead, so the lights stay as they are. While it plays, moving jumps straight there, with smooth and delay as if it had played through to that point, and clipbeat counting from where the placement starts.
A track with placements plays nothing between them, and a track with none stays with the launch grid.
The metronome button beside the BPM field in the header sets how fast it plays. Off, the default, it follows the show, so it speeds up and slows down with Tap, Link or the DJ decks, and the field is grayed out. On gives it a tempo of its own, set in the field: that takes over from the show's while it plays, in the header too, and nothing else moves it until it ends. The header's tempo then only changes what the show goes back to, and Link and the DJ decks are ignored until then.
Launching it live
An arrangement can be a clip in the launch grid, so any scene can start one, along with whatever else is in its row.
- Select a track and set Plays on in the Inspector to Arranger. It's an arranger track now, and it isn't a row in the arranger. A show can have as many as you like.
- Make a clip on it, as on any track, and choose what it Plays in the Inspector. The grid marks it with ▤, and while it plays a bar along its top shows how far through it is, on the tablet too.
Launching the clip starts the arrangement on its launch point, with the clip's or scene's fade, and stopping the track stops it with a fade too. So schedules, OSC and the tablet remote all work.
An arrangement plays as one layer, at its arranger track's place among the tracks. Everything launched by hand carries on under or over it, depending on which side of the arranger track it's on, and nothing is taken away from it. The arranger track's fader mixes the whole arrangement in, and mute and solo work on it. Inside it, each track keeps its own blend mode, so the arranger track has none. Its fader leaves the audio alone.
Several arrangements can play at once, each on its own arranger track. The transport can pause and move any of them.
An arrangement with a set tempo keeps it for itself, whatever happens to the show's tempo, so its audio stays in time. It also takes over the show's tempo while it plays. If several do, the last one started takes over. When it ends, the tempo goes back to the one before it that's still playing, or to the show.
When it's over: an arrangement stops by itself after its last clip. Under Next clip action, When it ends moves on to another clip the moment it does. A scene with arrangements in it has Then in its Inspector: what to launch once they've all ended. Stopping them by hand doesn't count.
In blind mode all of this happens in blind, so you can try a launch without the lights.